Wednesday, April 25, 2018

URL limits

One of the things that often causes mistakes in using SharePoint is naming of Library, List, Folder, and file. If we do not pay attention to the length of the name we will quickly get to the limit.
In the pictures below you can see some errors that are caused by long file names.


Limits are:

- SharePoint 2013 - 256 characters
- SharePoint 2016 - 400 characters

The file name is all this:


https://sitename.com/vbd/Project%20management/SOP/PROJECT%20MANAGEMENT/PC/_7%20PC/PROJECT%20STATUS%20REPORTS%207%20PC/Asset/materials%20missing%20status%20reports% 20i% 20CR% 20logs / 11.04.2016_Project_Status_Report% 20% 20-% 20central% 20horticulture% 20services.xls? D = w9b1d5c7267604f4aa5eaf3b5dee2bf8d 


and it all brings together 309 characters which is close to this limit.

The components are URL = protocol + server name + folder name or path to folder + file name or folder + parameters


In our case:

Protocol -> https://


Server Name -> sitename.com/


Folder name or path to folder -> 

vbd/Project%20management/SOP/PROJECT%20MANAGEMENT/PC/_7%20PC/PROJECT%20STATUS%20REPORTS%207%20PC/Asset/materials%20missing%20status%20reports% 20i% 20CR% 20logs /

File name or folder -> 11.04.2016_Project_Status_Report% 20% 20-% 20central% 20horticulture% 20services.xls


Parameters set by sharepoint -> ? d = w9b1d5c7267604f4aa5eaf3b5dee2bf8d

Tool for migrating sites to SharePoint Online

Tools for migrating SharePoint On-prem to SharePoint Online:

- Metalogix
   - in my humble opinion best tool for migrating content
   - tool is not limited only for on-prem to cloud so you can use it for all direction migration
   - you can use it for 15 days for free
   - unlimited use for this 15 days
   - cost of licence depends of SharePoint Farm size (GB)

- Sharegate
   - tool is not limited only for on-prem to cloud so you can use it for all direction migration
   - you can use it for 15 days for free
   - unlimited use for this 15 days
   - there are two ways of licencing (Standard and Nintex)

- SharePoint Migration Tool
   - the best part about this tool is, it’s free
   - you can migrate from SharePoint on-premises or from File Share to SharePoint Online

"Access Denied" to Access Requests list or “Request approval failed” when you process a pending request in SharePoint Online

You have a Microsoft SharePoint Online site on which the Allow access requests setting is enabled.
When users who have Full Control permissions to the site clicks Access requests and invitations in Site Settings, they receive the following error message:


Also, when users browse to the Access Requests list and then click Approve or Decline for a pending request, they receive the following error message:


--------------------------------------------------------------------

To resolve this issue, users must be either site collection administrators or be members of the Owners group for the site. The Owners group must also have permissions to access the Access Requests list. Use the following solutions as appropriate for your specific configuration.

- Check if user have site collection administrator permission
If an affected user should be a site collection administrator, go to the following Microsoft website for more information about how to manage administrators for your sites: Manage administrators for a site collection
Add the user to the Owners group for the site
If the user should be a site owner, you must add the user to the Owners group for the site. To do this, follow these steps:
     1. As a user who can change site permissions, browse to the affected site or site collection. Click the gear icon for the Settings menu, and then click Site settings.
     2. Click Site permissions.
     3. Click the Owners group for the site.
     4. Click New.
     5. In the Share dialog box, enter the user account of the user who you want to add to the group. Then, click Share.
     6. Test to verify that the user can now access the list and approve or decline requests.

- Make sure that the Owners group has permissions to the Access Requests list
If the Owners group is changed or was removed from the Access requests list, you must add the Owners group permissions for the list. You must also make sure that the affected user is included in the Owners list. To do this, follow these steps:
     1. As a user who has the Manage Permissions Permission Level on the affected site and who also has access to the Access Requests list (for example, a Site Collection administrator), browse to the Access Requests list in Internet Explorer.
     2. Press F12 to open the F12 Developer Tools window.
     3. Click the Network tab, and then press F5 to enable network traffic capturing.
     4. Refresh the Access Requests page in Internet Explorer. After the page has loaded, press Shift+F5 to stop capturing network traffic.
     5. In the Developer Tools window, double-click the first result in the URL list. This URL ends in "pendingreq.aspx."
     6. In the Developer Tools window, click Response body.

      7. In the search box, type pagelistid:, and then press Enter.
      8. Copy the GUID that follows the pageListId. The GUID will be between an opening brace ( { ) character and a closing brace ( } ) character as follows: {pageListId} {58f0f052-7f38-4ab8-8384-e79c456f167e}
Note Include the opening and closing brace characters when you copy the GUID. This GUID is the identifier for the SharePoint Online Access Requests list for your organization.
      9. In the browser address bar, enter https://<URL<URL of affected site or site collection>/_layouts/15/ListEdit.aspx?List=<{GUID}>, and then press Enter.
     10. On the Settings page, click Permissions for this list.

     11. Make sure that the Owners group for the site is included in the list of permissions for the Access Requests list. If the Owners group for the site collection does not exist, click Grant Permissions, enter the name of the Owners group for the site in the Share dialog box, and then click Share.

Tuesday, April 24, 2018

GET all Credentials from Secure Store Service

Before some time i need to find out credentials which are used in Secure Store service and this script helped me.

******************************

Add-PSSnapin "Microsoft.SharePoint.PowerShell"

$serviceCntx = Get-SPServiceContext -Site http://YourIntranetSiteURL
 $sssProvider = New-Object Microsoft.Office.SecureStoreService.Server.SecureStoreProvider
 $sssProvider.Context = $serviceCntx
 $marshal = [System.Runtime.InteropServices.Marshal]

try
  {
  $applicationlications = $sssProvider.GetTargetApplications()
  foreach ($application in $applicationlications)
  {
  Write-Output "`n$($application.Name)"
  Write-Output "$('-'*100)"

try
  {
  $sssCreds = $sssProvider.GetCredentials($application.Name)
  foreach ($sssCred in $sssCreds)
  {
  $ptr = $marshal::SecureStringToBSTR($sssCred.Credential)
  $str = $marshal::PtrToStringBSTR($ptr)
 Write-Output "$($sssCred.CredentialType): $($str)"
  }
  }

catch
  {
  Write-Output "(Something went wrong) - Error getting credentials!"
  }
  Write-Output "$('-'*100)"
  }
  }

 catch
  {
  Write-Output "(Something went wrong) - Error getting Target Applications."
  }

******************************

Output should look something like this


Export and Import Managed Metadata

Run SharePoint Management Shell and run Get-SPServiceApplication. Copy Managed Metadata ID.


Powershell for Export:

$mmsApp = “edc143d6-5a4a-4a99-8689-81852b3304c4”; #this sets the exporting MMS ID

$mmsproxy = Get-SPServiceApplicationProxy | ?{$_.TypeName -eq "ExportTaxonomyProxyName"};

Export-SPMetadataWebServicePartitionData -Identity $mmsApp -ServiceProxy $mmsproxy -Path \\location\exportfile.bak;


Powershell for Import:

$mms2 = "3a5e0b4f3a1c4cd0b067381240c7a3bc"   #this sets the importing MMS ID

$mms2proxy = Get-SPServiceApplicationProxy | ?{$_.TypeName -eq "Managed Metadata Service Connection"};

Import-SPMetadataWebServicePartitionData -Identity $mms2 -ServiceProxy $mms2proxy -path \\location\exportfile.bak -OverwriteExisting;

Monday, April 23, 2018

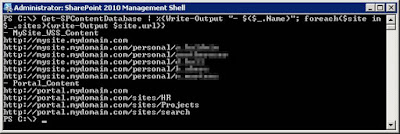
Get Site Collections Per Content Database

Script:

Get-SPContentDatabase | %{Write-Output "- $($_.Name)”; foreach($site in $_.sites){write-Output $site.url}}


Output:

Change SPSite URL


To change URL of site you should run this script:


$site = Get-SPSite http://portal.contoso.com/sites/burek

$uri = New-Object System.Uri("http://burek.contoso.com") 

$site.Rename($uri)


After this change there is possibility that your site would not be accessible through new URL so you need to run Full Crawl on your Farm.

After Full crawl is finished site will be accessible through new URL.

Create new Search topology on two servers

Parameters to change:

$AppServer1 = write your app server name
$AppServer2 = write your app server name
$PrimaryIndexLocation = location of index. It would be best to put index on other partition then your system data. Do not forget to check if you already have this location created and if you have check if it is empty.
$ReplicaIndexLocation = location of index replica. It would be best to put replica on other partition then your system and index location. Do not forget to check if you already have this location created and if you have check if it is empty.
$SearchAppPoolAccountName = write your account
$DatabaseServer = database server name. Check do you have default instance (e.g. servername) or named instance (e.g. servername\instancename)


Script:

********************************

$AppServer1 = "First app server"
$AppServer2 = "Second app server"
$SearchAppPoolName        = "SearchServiceApp"
$SearchAppPoolAccountName = "YourDomain\sp_content"
$SearchServiceName        = "SearchServiceApp"
$SearchServiceProxyName   = "SearchServiceAppProxy"
$DatabaseServer           = "DatabaseServer\InstanceName"
$DatabaseName             = "SearchServiceApp_DB"
$PrimaryIndexLocation     = "G:\Index"  #!!!!!Do not forget to check if you already have this location created and check if it is empty!!!!!
$ReplicaIndexLocation     = "X:\Index" #!!!!!Do not forget to check if you already have this location created and check if it is empty!!!!!

#Create a Search Service Application Pool
$spAppPool = New-SPServiceApplicationPool -Name $SearchAppPoolName -Account $SearchAppPoolAccountName -Verbose

#Start Search Service Instance on all Application Servers
Start-SPEnterpriseSearchServiceInstance $AppServer1 -ErrorAction SilentlyContinue
Start-SPEnterpriseSearchServiceInstance $AppServer2 -ErrorAction SilentlyContinue
Start-SPEnterpriseSearchQueryAndSiteSettingsServiceInstance $AppServer1 -ErrorAction SilentlyContinue
tart-SPEnterpriseSearchQueryAndSiteSettingsServiceInstance $AppServer2 -ErrorAction SilentlyContinue

#Create Search Service Application
$ServiceApplication = New-SPEnterpriseSearchServiceApplication -Partitioned -Name $SearchServiceName -ApplicationPool $spAppPool.Name -DatabaseServer $DatabaseServer -DatabaseName $DatabaseName

#Create Search Service Proxy
New-SPEnterpriseSearchServiceApplicationProxy -Partitioned -Name $SearchServiceProxyName -SearchApplication $ServiceApplication

$clone = $ServiceApplication.ActiveTopology.Clone()
$AppServer1SSI = Get-SPEnterpriseSearchServiceInstance -Identity $AppServer1
$AppServer2SSI = Get-SPEnterpriseSearchServiceInstance -Identity $AppServer2

#We need only one admin component
New-SPEnterpriseSearchAdminComponent –SearchTopology $clone -SearchServiceInstance $AppServer1SSI

#We need two content processing components for HA
New-SPEnterpriseSearchContentProcessingComponent –SearchTopology $clone -SearchServiceInstance $AppServer1SSI
New-SPEnterpriseSearchContentProcessingComponent –SearchTopology $clone -SearchServiceInstance $AppServer2SSI

#We need two analytics processing components for HA
New-SPEnterpriseSearchAnalyticsProcessingComponent –SearchTopology $clone -SearchServiceInstance $AppServer1SSI
New-SPEnterpriseSearchAnalyticsProcessingComponent –SearchTopology $clone -SearchServiceInstance $AppServer2SSI

#We need two crawl components for HA
New-SPEnterpriseSearchCrawlComponent –SearchTopology $clone -SearchServiceInstance $AppServer1SSI
New-SPEnterpriseSearchCrawlComponent –SearchTopology $clone -SearchServiceInstance $AppServer2SSI

#We need two query processing components for HA
New-SPEnterpriseSearchQueryProcessingComponent –SearchTopology $clone -SearchServiceInstance $AppServer1SSI
New-SPEnterpriseSearchQueryProcessingComponent –SearchTopology $clone -SearchServiceInstance $AppServer2SSI

#Set the primary and replica index location; ensure these drives and folders exist on application servers

#We need two index partitions and replicas for each partition. Follow the sequence.
New-SPEnterpriseSearchIndexComponent –SearchTopology $clone -SearchServiceInstance $AppServer1SSI -RootDirectory $PrimaryIndexLocation -IndexPartition 0
New-SPEnterpriseSearchIndexComponent –SearchTopology $clone -SearchServiceInstance $AppServer2SSI -RootDirectory $ReplicaIndexLocation -IndexPartition 0
New-SPEnterpriseSearchIndexComponent –SearchTopology $clone -SearchServiceInstance $AppServer2SSI -RootDirectory $PrimaryIndexLocation -IndexPartition 1
New-SPEnterpriseSearchIndexComponent –SearchTopology $clone -SearchServiceInstance $AppServer1SSI -RootDirectory $ReplicaIndexLocation -IndexPartition 1

$clone.Activate()

$ssa = Get-SPEnterpriseSearchServiceApplication
Get-SPEnterpriseSearchTopology -Active -SearchApplication $ssa
 
Write-Host "Search topology successfully created!"


********************************

Create new Search topology on single server

Parameters to change:
$AppServer = write your app server name
$IndexLocation = location of index. It would be best to put index on other partition then your system data. Do not forget to check if you already have this location created and if you have check if it is empty.
$SearchAppPoolAccountName = write your account
$DatabaseServer = database server name. Check do you have default instance (e.g. servername) or named instance (e.g. servername\instancename)
$DatabaseName = name of Search app database

Script:

********************************

Add-PsSnapin Microsoft.SharePoint.PowerShell -ErrorAction SilentlyContinue

#Defaults
$AppServer = "SERVERNAME"
$IndexLocation = "E:\SharePointSearch"  #!!!!!Do not forget to check if you already have this location created and if you have check if it is empty!!!!!
$SearchAppPoolName = "SearchServiceAppPool"
$SearchAppPoolAccountName = "YourDomain\sp_content"
$SearchServiceName = "Search Service Application"
$SearchServiceProxyName = "Search Service Application Proxy"
$DatabaseServer = "DatabaseServer\InstanceName"
$DatabaseName = "SearchServiceApplication_DB"

#Create ApplicationPool
Write-Host "Creating Application Pool..."
$spAppPool = New-SPServiceApplicationPool -Name $SearchAppPoolName -Account $SearchAppPoolAccountName -Verbose

#Start Search Instances
Write-Host "Starting Search Service Instances..."
Start-SPEnterpriseSearchServiceInstance $AppServer -ErrorAction SilentlyContinue
Start-SPEnterpriseSearchQueryAndSiteSettingsServiceInstance $AppServer -ErrorAction SilentlyContinue

#Create Application
Write-Host "Creating Search Service Application..."
$searchServiceApp = New-SPEnterpriseSearchServiceApplication -Partitioned -Name $SearchServiceName -ApplicationPool $spAppPool.Name -DatabaseServer $DatabaseServer -DatabaseName $DatabaseName

#Create proxy
Write-Host "Creating Search Service Application Proxy..."
New-SPEnterpriseSearchServiceApplicationProxy -Partitioned -Name $SearchServiceProxyName -SearchApplication $searchServiceApp

#Clone the default Topology...create a new one...and then activate it
Write-Host "Configuring Search Component Topology..."
$clone = $searchServiceApp.ActiveTopology.Clone()
$searchServiceInstance = Get-SPEnterpriseSearchServiceInstance -Identity $AppServer

#Create new topoplogy
#Create Admin component
New-SPEnterpriseSearchAdminComponent –SearchTopology $clone -SearchServiceInstance $searchServiceInstance
#Create content processing component
New-SPEnterpriseSearchContentProcessingComponent –SearchTopology $clone -SearchServiceInstance $searchServiceInstance
#Create Analytics processing component
New-SPEnterpriseSearchAnalyticsProcessingComponent –SearchTopology $clone -SearchServiceInstance $searchServiceInstance
#Create Crawl component
New-SPEnterpriseSearchCrawlComponent –SearchTopology $clone -SearchServiceInstance $searchServiceInstance
#Create Index component
New-SPEnterpriseSearchIndexComponent –SearchTopology $clone -SearchServiceInstance $searchServiceInstance
#Create Query processing component
New-SPEnterpriseSearchQueryProcessingComponent –SearchTopology $clone -SearchServiceInstance $searchServiceInstance


#Activate topology
$clone.Activate()

Write-Host "Search topology successfully created!"

********************************

Display top navigation on search results page

Here you can find JavaScript that will display the global navigation on your search results page as by default its hidden.

********************************

<script>
var refElm = document.getElementsByClassName('ms-searchCenter-refinement');
if (refElm.length > 0) {
  // Unhide the title row
  document.getElementById('s4-titlerow').setAttribute('style', 'display:block !important');
  // Set the Site Title
  document.getElementById('DeltaPlaceHolderPageTitleInTitleArea').innerHTML = 'Search Center';
  // Hide the search icon
  document.getElementById('searchIcon').style.display = 'none';
  // Remove the top margin
  refElm[0].style.marginTop = 0;

  // The following lines are only needed for firefox
  var css = '#s4-bodyContainer #s4-titlerow { display: block !important; }',
      head = document.getElementsByTagName('head')[0],
      style = document.createElement('style');
  style.type = 'text/css';
  style.appendChild(document.createTextNode(css));
  head.appendChild(style);
}
</script>

********************************

To put this JavaScript to search result page you need to insert Script Editor Web Part.

Result should be something like this:


Display version info for installed SharePoint product and language packs

PowerShell script which retrieves the version information for the patch baseline from the registry and allows to identify components.

**************************************

Param(
  # decide on whether all the sub-components belonging to the product should be shown as well
  [switch]$ShowComponents
)
# location in registry to get info about installed software
$RegLoc = Get-ChildItem HKLM:\Software\Microsoft\Windows\CurrentVersion\Uninstall
# Get SharePoint Products and language packs
write-host "Products and Language Packs"
write-host "-------------------------------------------"
$Programs = $RegLoc | 
where-object { $_.PsPath -like "*\Office*" } | 
foreach {Get-ItemProperty $_.PsPath} 
$Components = $RegLoc | 
where-object { $_.PsPath -like "*1000-0000000FF1CE}" } | 
foreach {Get-ItemProperty $_.PsPath} 
# output either just the info about Products and Language Packs
# or also for sub components
if ($ShowComponents.IsPresent)
{
$Programs | foreach { 
$_ | fl  DisplayName, DisplayVersion; 
$productCodes = $_.ProductCodes;
$Comp = @() + ($Components | 
where-object { $_.PSChildName -in $productCodes } | 
foreach {Get-ItemProperty $_.PsPath});
$Comp | Sort-Object DisplayName | ft DisplayName, DisplayVersion -Autosize
}
}
else
{
$Programs | fl DisplayName, DisplayVersion

}

**************************************
Output is something like this:


Export / import all solutions in SharePoint farm using PowerShell


Export Farm Solutions
  1. Create a backup folder on your disk and give it a meaningful name like “SP Farm Solutions Backup”.
  1. Open SharePoint Management Shell            
  2. Change directory or navigate to backup folder 
  1. Enter the following Script to extract all farm solution to current location directory

    (Get-SPFarm).Solutions | ForEach-Object{$var = (Get-Location).Path + “\” + $_.Name; $_.SolutionFile.SaveAs($var)}

  1. Go and open the target folder to see all exported solutions 


Import Farm Solutions
After copy the folder that contains exported solution on production or target farm server.
  1. Open SharePoint Management Shell
  2. Change directory or navigate to folder that contains all solutions to be deployed
  3. Enter the following Script to extract all farm solution to current location directory


Get-ChildItem | ForEach-Object{Add-SPSolution -LiteralPath $_.Fullname} 


  1. So all solutions are added to the target farm.


Install Farm Solution

If you install solution on Web application

Install-SPSolution -Identity SolutionName.wsp -WebApplication http://WebAppName -GACDeployment -CompatibilityLevel {15}

         or if you install it on Farm

Install-SPSolution -Identity SolutionName.wsp -GACDeployment -CompatibilityLevel {15}

More information about Install-SPSolution you can find on this link.